 Topper's
Place
Topper's
Place

|
|
Click here to go to this page at new link Soil Blocks
I love doing things the easy way, and, for me, soil blocks are the only way. No containers to clean and sanitize every year. No storing the flats and packs during the off season. No expense in replacing the packs that broke or just plain can’t take another season. No mass seedings in an effort to save time only to end up spending hours untangling roots of all the seedlings in the hope of saving enough to get the plants you want/need. And best of all, really healthy and strong seedlings with the least amount of work. I learned about soil blocks almost ten years ago.. and once I did I HAD to find out how to do it.. I did some looking and found that you can buy them but, well, money has always been in short supply for me so once I found out how much they cost to buy.. I decided to make my own. Oh, I did some checking online last night as I started putting this together and the two sources that I located that carried them are out.. I’m wondering if no one makes the makers anymore..?
Okay.. How to make your soil block makers
Start
with rounding up the parts.
Tools Getting the parts
ready Assembly of the Soil Block Maker Drawing of Assembled Soil Block Maker Soil Block Maker in Action (Pictures of working block maker and planted blocks)
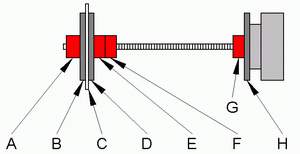
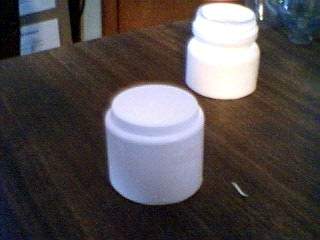
Okay.. How to make your soil block makers… Start with rounding up the parts. Small: For the tiny seeds (begonias, strawberries, tomatoes, lettuces, impatiens, etc.) you’ll want a small circle or cube about an inch across. I’ve used both round and square. I prefer square (better utilization of space) but go with the parts that you can find. I found that small medicine bottles were the way to go. You’ll want at least two for each small block maker that you want to make and an extra one if you’re making a medium block maker and another for the large block maker. Since none of us are perfect you might want to have extras just in case you cut wrong or goof something up. I know I didn’t get my first one right! You’ll need a long screw for each small maker with three nuts and three flat washers, a fourth nut and washer is nice, but not mandatory. A length of 2 ½ to 3 inches is fine.. See what you can find that has matching nuts and washers. The diameter of the screw isn’t crucial, but the nuts should be about ¼ inch across. The nuts are going to be making the divit in the soil block where you’ll be dropping your seed. Three washers are used with the nuts to protect the plastic of your block maker from being worn by the nuts as you extract the finished blocks. The fourth one just makes the plunger a bit easier for you to grab. The washers should be about a ½ inch across and fit the shaft of the screw.
Medium: You’ll use these for the larger, faster growing seeds (cukes, beans, etc.) and for putting your small blocks in when their seedlings need more room. Here I’ve mostly used round shapes, again, because of availability. The larger vitamin and aspirin bottles are a nice size. Go for something about 3 to 3 ½ inches across. You’ll want two for each medium block maker you want and an extra one if you’re going to make a large block maker. Again, just in case you goof, you may want to have some extras. You’ll want a bit heavier screw/bolt for this one, four to six inches long is pretty good. Three nuts and three washers for each plunger, a fourth of each if you want a ‘handle’. You want the nuts to be ½ to ¾ inch across, and the washers to be about a bit bigger than the nuts… again, to protect the plastic. You’ll need one plunger for the medium block maker for regular planting and a second plunger to make medium blocks that you can transplant the small blocks into.
Large: This was the toughest of the three sizes to make. It’s for the really fast growing things… and for the medium sized blocks to be moved up to. I couldn’t find anything sturdy enough in a size that would accommodate the medium sized blocks. My dad was working on a project that needed the large diameter PVC pipe.. He had a left over chunk and cut a section for me and another friend made a plunger for me out of wood. See what you can come up with, aim for something about 6 inches across. This one was large enough for me to do with my hand so I didn’t make a plunger handle for it.. but you can if you want to.
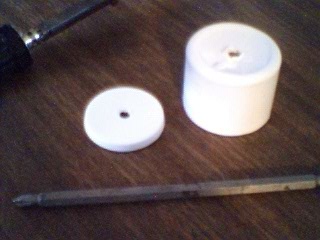
To make the holes: You need to melt round holes in the bottoms of your cubes/rounds. I tried drilling but it made the plastic too weak and caused it to tear after a hundred blocks or so. I found the melting the hole worked much better. If you don’t have a soldering iron I’ve also used a heavy nail and a candle… I held the nail with a pliers and heated the tip of the nail in the flame and then used the hot nail to burn the hole. Which ever way you do it – BE CAREFUL. Working with flame/heat etc. can be dangerous. You wouldn’t want to burn yourself or start a fire. Kids - don’t do this without an adult around to help you set things up safely (and don’t forget, they’ll be able to show you easier ways to do things, learn the tricks early and save yourself a bunch of time and work!). The idea here is to work on a project that will be helpful and fun not something to cause pain or damage – or get you into trouble.
To make the plungers: Two pairs of pliers for tightening the nuts and some type of glue. I’ve used super glue (not so good if you have to replace any pieces), school glue (didn’t hold up to washings), nail polish (worked pretty well), silicone rubber (worked well but was harder to keep clean). What you’re looking for is something to keep the nuts from working loose. It’s nice if you don’t have to keep stopping to tighten the loosening screws.
To cut the parts: I use a box cutter with a single edge razor blade mostly, but an exacto knife works pretty good too. Just be careful not to cut yourself or any thing/body around you, it’s easy to slip with the blade. Remember to cut away from your body and be aware of what you might hit if you slip. Don’t cut the people that you may be working with. I tend to place a piece of wood on the table that I’m working on and put the bottle on the wood.. that way if I slip the blade goes into the wood…. Now, why do I stop to point that out? The first time I did this I was ‘smart’ and was just sitting in a chair. I couldn’t hang on very well to that little bottle and ended up putting it on my leg to help hold it, the blade slipped. I was lucky. I cut my jeans and only grazed my leg!
Do this when you have some time to sit and concentrate. It’s another one of those projects where it seems really hard at first but once you get everything in order in your head they are really pretty easy to make. You’re gonna love ‘em, really! Small Block Form: Okay.. You’ve got a bottle about an inch or so across. You’re gonna want to cut the top off the bottle. You’re going to be using the bottom half… Picture it like an open top box. Make the cut so that the ‘box’ is about 25% deeper than it is wide.
Plate:
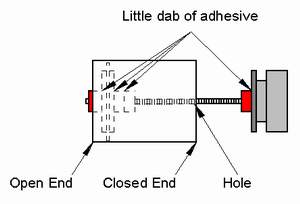
The holes for the handles: Put your flat piece inside the box piece and then melt a hole in the center (no, you don't need to be exact... just take a good aim and go for it). Burning from the inside with the flat piece in place will mean that the holes will line up.. Makes it much easier than trying to measure...
Handle: Check out the drawing.. Get an idea of what it should look like. But DO NOT put it together yet. You have to put the ' box' piece on this one before you put the nuts in place and set them with the glue or nail polish or whatever adhesive you have, or you'll have to take it all apart again and redo it. I wanted you to be able to have a clear look of the sequence of the parts so it'll be easier to put together - But, the 'box' piece still goes in here.
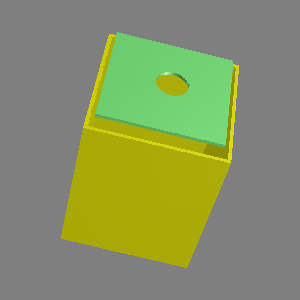
Assembly
of Soil Block Maker
You might want to assemble this all first to see that everything works correctly before adding your adhesive (which isn't necessary, but if you don't use it you'll find that you'll have to keep retightening the nuts while you work and that can be a pain.)
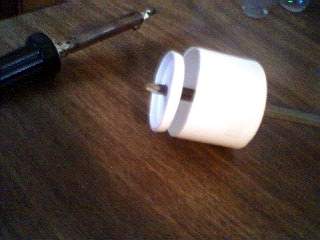
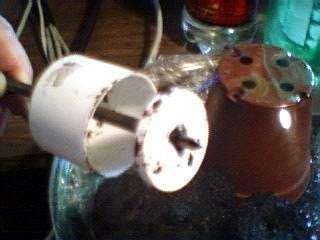
What you should have when you're all finished is a little open ended container with a plunger than you can pull in or push out.. kind of like a hypodermic needle or cookie press pulls in and out. Got it?
I found myself in need of a soil block maker today but didn't have the nuts, screw or washers.. so I thought about it for a bit and came up with a temporary plunger handle. Anyway.. I threw one together quick and took pics so that you could see....
Sometimes you'll be lucky and find a round bottle whose lid is just the perfect size.
If you look carefully at the two pics to the left and center.. the bottle lid is facing with the inside of the lid out.. You DO NOT want to do that.. you want the inside of the lid facing the inside of your block maker.. it makes it IMMENSELY easier to get your finished block off if you are dealing with a flat surface and not the soil block wedged into the lip of the lid.. the pic on the right shows the correct direction. I turned it around after I couldn't get my first block off! hehehehehe I forgot....
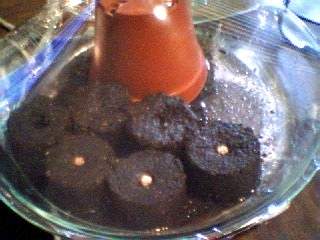
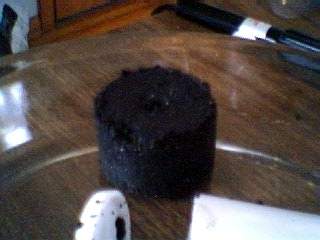
Now just press the moistened soil firmly into your block maker. Press the plunger to push out the block, and lift off the block.. that's it! Make as many blocks as you need. The phillips head (in this case) is making the divit where the seeds will be placed.
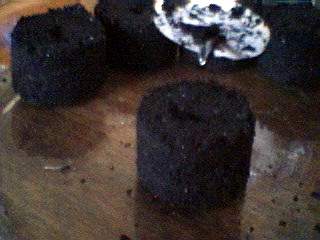
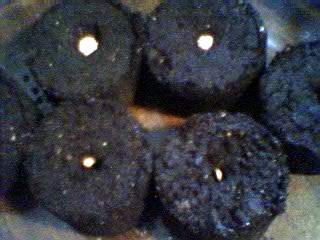
Here we have a finished block. The left pic as a bit of paper marking the divit.. the second one is without the marker.
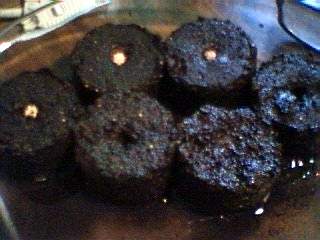
On the left we have three Jewel Mix Nasturtiums and three Celebrity tomato seeds neatly tucked in their divits. In the center the blocks have been watered. Don't give them much.. just enough to lightly dampen the surface and to leave a bit of a puddle in the container.. if you give them too much water before roots develop the blocks may collapse... Since the soil is pretty wet when you form the blocks the seeds have plenty of moisture to get started. On the right we have the blocks on a glass pie plate with 3" pot being used to hold the saran wrap up above the soil blocks so the new plants will have some room to grow. The plastic will hold moisture for the seedlings to begin growing.. once they have started coming up open up the plastic a bit or punch a hole to allow it to breathe.. as the roots develop the will grow to the edge of the soil block and just stop, they don't tangle and wind around like they would in a container... when you see the white roots at the edges.. time to move them to their new homes. If you use your block maker to make a 'divit' the size of the soil blocks you can simply pick up your block and drop it in the perfectly preshaped hole.. water and watch you little plant grow.
Amazingly simple tool, isn't it?
|
Remember, Topper's Place is moving, feel free to add the new link to your Favorites: www.toppers-place.comEmail:
Topper (Linda)
|