 Topper's
Place
Topper's
Place

|
|
Click here to go to this page at new link Computer type gadgets that you can make.....
Many of us 'geeky' types are into customizing and modifying our systems, after all, that's a big part of the fun about being a geek. For myself.. I LOVE to tinker with my equipment - but - when money is scarce it's hard to get your stuff to be REALLY cool.... ... or is it?
I cruise the internet and find all kinds of neat toys that I would just die for.. but my budget doesn't allow. So, faced with such impossible hurdles I used to sit and pine for what I could not have. But, being my father's daughter (remember, my father is an inventor - shameless plug here - check his section of my site, featuring one of his inventions) I would start to think on it, and imagine, and start to tinker with ideas. Sometimes putter on the computer with a CAD program to visualize better. I'd think about what kinds of junk I've got laying around.. and well, come up with stuff. So... here's some of the stuff that I've come up with.. Feel free to scarf the ideas and see what you can come up with for your own needs/wants/dreams? ! hehehehehehe If you come up with a really cool idea, I hope you'll share!
Laptop Gadgets, Ideas, and
stuff Desktop
Gadgets
Laptop Gadgets, Ideas, and stuff...
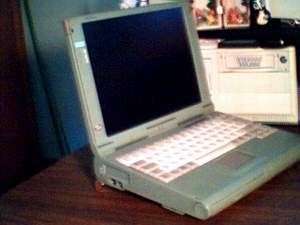
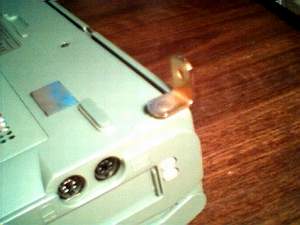
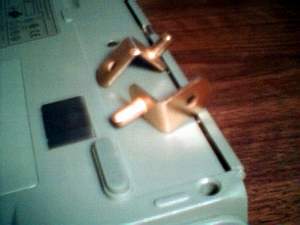
Passive Laptop Cooling System (for under 2 bucks).... I didn't like how hot my laptops were getting and started looking at solutions. The models that I have do not have fans so it was not going to be a matter of modifying or replacing a fan to find a solution. I did find a really cool, I thought, item online that would solve the problem, but, well there was that ole money problem rising it's head again. The gadget I found was a fan system, in the form of a platform, that you set your laptop on. It consisted of three fans in a unit about an inch high that drew the heat from the bottom of the machine. I thought it was pretty neat. Couldn't afford to buy one, though. So.. thought about it for awhile and started lingering on how to get air under the machine.. Rise it up, right? Okay, use what you have... four CD jewel cases, one under each corner. Air was moving underneath, but, well, the keyboard area still felt a lot hotter than I liked. Going back to passive solar heating/cooling.... thinking.... need to encourage the air to move... warm air rises... and as warm air moves away - cooler air takes it's place... so encourage the warm air to rise... GOT IT! I elevated the rear corners of the laptop about a 1/2 inch leaving the two front corners as they were - just a slit of space between the laptop and the desk courtesy of the laptops little rubber feet. Result? The warm air moved up along the bottom of the laptop and out the back behind the screen.. cooler room air was drawn in along the front of the laptop to replace the warm air that was rising out the back. It WORKED! The top of the keyboard was hardly even body temp at that point anymore... forget about it feeling hot! Far out! hehehehehe Next step. Come up with a way to implement the idea with the least amount of effort. I knew that most laptops have recessed screw holes on the bottom.. flipped mine over, yep, there they were....now, what to use that I could put in those holes? Popped into my head like a flash. I had some little brass shelf bracket things that I used on the hutch that I'd built.. I wonder???? Went and dug a couple out and sure enough, they fit.. A little loose in one pute.. just perfect in the other... Easy to pop on and off, took up hardly any space in the laptop case... perfectly portable and, because I had them laying around, free (otherwise you can pick them up at a hardware store for a couple of bucks). Then I worked on a new laptop for a client.. that had built in risers in the back, just like the ones that you find on a keyboard.... But, what the heck, even if I wasn't the first one to come up with the idea, I'm still pleased that I have the cooling effect for free
Here is the same machine on it's 'stilts' (click on it to get a larger view). Neat and trim it doesn't make the machine look at all dorky.
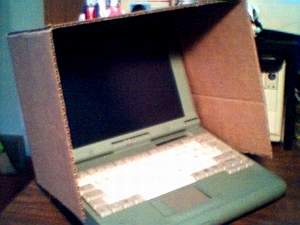
For now, I spend most of my time working with computers in one way or another, fixing, building, tutoring, learning new software.. and in the time that's left over I'm also writing a book. I do like to get outside when I can, but I stand a better chance if I can take my work with me. Once my life is all back in order and I get to choose how to spend my time I'll be doing a LOT more out of doors! At least that is what I keep telling myself! hehehehehehe Some of the new laptops are pretty easy to see outdoors in daylight, mine, however, are not. It's frustrating to only be able to go out to write or design on cloudy days or after dark, so I started searching. And, of course, found the perfect solution. But, well, the money thing again.... So had to do some thinking. My first sunshade was made out of old 24 can Coke cases. It worked but was a little bit of a hassle to get the paper clips that I used to attach it in place.. and the colors.. well, not my preference for what I wanted to display when out working... Know what I mean? It folded up nicely in the laptop case and did it's job so that's what I used until early in July of 2002. To make a long story short - My neighbors got some new furniture and I spotted the truck just before they were getting ready to leave. I was able to get some huge (5 by 7 foot or so) sheets of plain cardboard. I use cardboard a lot for my gadgety ideas... proto-types and finished projects, so this was a great find! So I started messing with a new sunshade a couple of nights later. The goal was to make it simpler to use.. and since it would be plain cardboard I can decorate it to my taste.
Now to customize it a bit further. Using what I have on hand.. I have some blue stamp pad ink (I kinda like the color blue! hehehehe) I'm going to color the inside of the shade to make it darker, I think black would be better, but I don't have anything black other than printer ink.. and I'm not using that up! For the outside. I'm considering either my T & L logo or maybe a blow-up of the business card that I use for my computer repair/tutoring/building services... Neat way to advertise when using the shade outdoors, right? hehehehe Which do you think I should use? In either case I want it to be on the light side to reflect heat....
Now, if you're one that wants to get into modding at a greater degree, be it painting the case or upgrading the innards... I've just started a new group with another gal, a Linda, that will be on just that very subject.. swing on by and see what's going on! You're welcome to swing by if you're into modding and/or laptops!
 Click to join Laptop_Modification
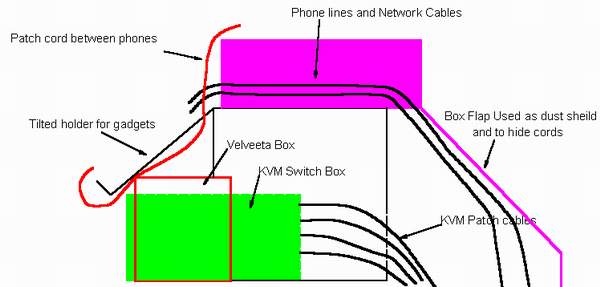
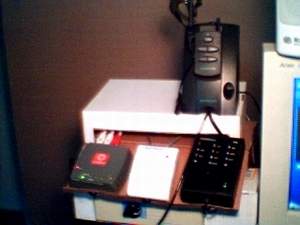
As a person that loves gadgets and things I sometimes end up with more stuff than I have space. I'm not an anal retentive neat freak, I'm a comfort person, but I hate having to hunt for things, look for things or constantly rearrange things during a project. So I'm always trying to make it 'better'. If I can set things up so that it's in reach when it's put away I'm more likely to put it away.. and end up with a neater work space and save a ton of time because I don't have to clean up (it's already put away) and I don't have to search for a lost something because it's just right over there.... So, on my desk I have a corded headset phone. A cordless headset phone with a base that attaches to the first phone. A 'Call Alert' box that I use to see if the phone line is in use. My network hub and a KVM switch box with four hookups. So, needless to say.. phone cords, network cable and patch cords everywhere. I've not liked it for a long time. So, brain went in gear, sometime in late June last year.. it was our third out of four days of thunderstorms and the putes were all unplugged to prevent lightening damage. I was bored and decided to be inventive. This project may not be something that anyone else in the world would want.. but, maybe, just maybe, it might spark an idea in your head for a something that would make your life a bit easier/neater/less of a hassle.... Or give you something to do next time you're bored out of your mind. Since the unit is already assembled I'm gonna do some quick drawings to show how I did it.. and then a pic of the unit with all my stuff already in place.
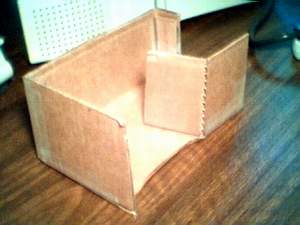
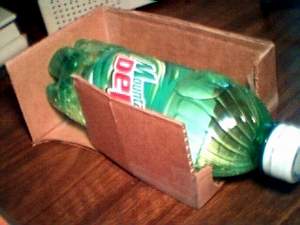
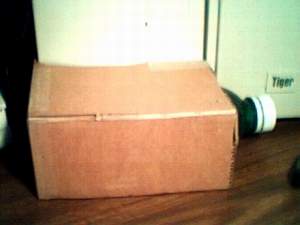
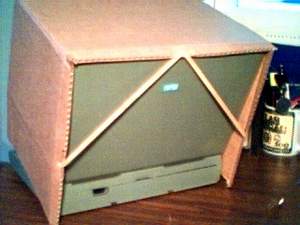
Sound Muffler and Manual Air Conditioner With the summer heat and having gotten used to not having the air conditioner on much I've had to learn to deal with things as best I can. The front mounted fan in my main tower case is horribly loud and I leave it unplugged until the weather gets so warm that it becomes a necessity to have it running. But that doesn't mean that I have to deal with ALL the noise. So I designed a 'muffler' for the case that is only needed with the fan is plugged in. It works great. During my last move, well, that little cardboard widget got destroyed and I didn't need to worry about it again until a heat wave that hit us last summer. So I ended up making a new one. This one I made a bit better then the last one. It also fits a frozen water bottle making it a pretty darn good air conditioner for the REALLY hot afternoons when I need to cool the puter off quickly or for a few hours. I've used frozen water bottles to cool systems off for years, but this is the first time that I've fit it into a 'muffler' - it's MUCH more efficient - the bottle cools for a longer period of time. The muffler is cut to custom fit the contours of the front of the case and is just large enough to tuck the frozen bottle inside when it's needed. I haven't decorated this one yet.. Haven't decided what I want to do with it. The last one was covered in white paper and looked a bit too sterile. I'd like to see if I can come up with something a bit fancier for this one. I'll have to see what I can dream up! I do know that I'll have a bear or two living on it for the summer... That's the female part of me.. little knick knacks and decorations! hehehehehe
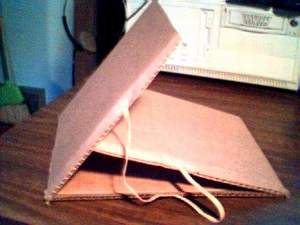
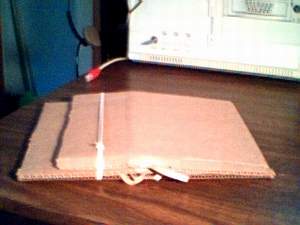
On the left you see the tower in its 'winter dress', crisp and clean. Center is with the muffler in place and on the right is the muffler flipped upside down, the little flap adds to the muffling and cuts down amazingly on the dust that the fan picks up!
On the right shows is the muffler upside down showing how the bottle fits inside. The 'muffle/dust' flap moved to fit the bottle. On the right shows the 'air conditioner' in place. Air is pulled by the fan through the open end of the box over and around the bottle cooling the inside of the computer extremely well. When the bottle is totally thawed simply get another frozen bottle for additional cooling time. I know there are better ways of cooling a system. But when you only have extreme temp issues intermittently during the summer months this works very well. I keep a bottle in the freezer at all times (in the summer) for each of the two main household computers so that if the temp alarm goes off I can just pull out a frozen one and throw another one in for next time.
I'm bound to be coming up with more gadgety things, especially with all the great cardboard I've got.... How about you?
|
Remember, Topper's Place is moving, feel free to add the new link to your Favorites: www.toppers-place.comEmail:
Topper (Linda)
|


 Remember,
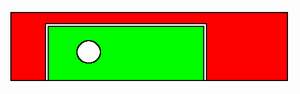
I used what I had laying around. I took a 5 lb. Velveeta cheese box and cut a
hole in the bottom to fit the KVM switch through. The red represents the bottom
of the box, the green the switch box, with the white knob.
Remember,
I used what I had laying around. I took a 5 lb. Velveeta cheese box and cut a
hole in the bottom to fit the KVM switch through. The red represents the bottom
of the box, the green the switch box, with the white knob.