 Topper's
Place
Topper's
Place

|
|
Click here to go to this page at new link Love
Fresh Salads ? This started out as just finding a use for some wood that my neighbor dropped off one day... I took a piece of 3/4 inch plywood that measured roughly 1 1/2 by 2 feet and stared at it for the longest time. Then it hit me.. Off to the lumber store to pick up some 1 X 2 furring strips. using the strips as sides I made a box. The sides were set on top of the bottom to allow for the most depth. After I had it all screwed together I sanded all the edges and corners to make it all smooth I then stained the wood, inside an out (my favorite, dark walnut) and then gave it a good coat of poly, inside and out. I had a really nice looking shallow box... Now for where my imagination had landed. I used silicone rubber caulk to seal all the seams to make the box water tight. I put a quarter inch of aquarium gravel on the bottom. I then divided the area into roughly six sections and placed two little plastic dixie-cups (stacked together) in the center of each of the six sections. Then I filled the box half way with my potting soil mix, high in perlite and peat moss (a soil-less mix would work well too) evenly in the box. Now take out the inside cups that have soil in them leaving the clean empty cups in place Here comes the cool part, I think. Cut some lengths of pure cotton kite string placing one end in an empty cup and trail the rest out over the soil. Use about 4 strings per cup and have the strings spider out from each cup so that you have the lengths of strings evenly spread out over the surface of the soil mix. These strings will be the water wicks that will water the plants in the box. Take your time and space things evenly. 'Cause if you miss a spot it's hard to fix later. Now replace the cups that you removed earlier, being careful to make sure that the strings are touching or slightly curling in the bottom of the cups in the box.
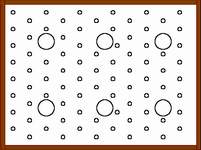
Now you can finishing filling with soil right to the top edge and gently firm, don't pack it tight.. just firm enough to make sure that there aren't any holes or gaps in the soil. Picking up the box a few inches from the surface that you're working on and dropping it will help settle the soil, too. Remove the inner cups once you're happy with the way the soil looks. Evenly firmed and just about level with the top edge of the sides of the box.. Now grab a pencil (use the eraser end) or dowel or something similar You'll be pressing small holes in the surface of the soil about half the depth of your little finger nail, not too deep, you're aiming for just a dimple in the soil. Do a diamond pattern, check my little drawing below to get an idea of how to space the dimples - each column is two inches apart, each row is two inches apart, with every other row and column offset by 1 inch. Are you with me so far?
Now, into each dimple drop two lettuce seeds. I used Black Seeded Simpson and Red leaf in my boxes. Both work well and make wonderful salads and sandwiches. A tweezer or small needle nose pliers makes this easier. You won't need to put anything over the seeds, the dimples that you made will provide just the protection that the seeds need to get moisture and light for sprouting. If you just feel that you have to put something over the seeds you can take a pinch or so of peat moss and put it over each dimple. But it's really not needed and a lot of extra work. Now grab your plant mister bottle and give the entire surface of the box a good misting... Your goal is to moisten the soil well but to not allow the water to puddle and collect in the bottom of the box. I usually mist a new box a half dozen times or so over an hour's time, pulling the trigger on each area until the surface looks wet. Watching to make sure that all the water is absorbed. When it's getting to take to long to look 'dry' again, time to stop. Put the box in a well lit location, lettuce seeds need a bit of light to germinate but full sun at this point will just dry out the soil surface too quickly and reduce germination rates, fill your dixie cups with water.. not quite to the top.. don't let them over flow, you don't want puddles. Keep an eye on your box, make sure that the cups NEVER run dry, and fill them just short of the tops so that they don't over flow. Watch for the seeds to sprout. When they do use a small scissor or nail clipper to cut the weaker of the two seedlings in each dimple, leaving the stronger one to grow. Be careful when you do this - try to disturb the seedling that you are keeping as little as possible. Move your box into bright light, like in front of south facing window or your greenhouse shelf. Cut the twins as the seeds continue sprouting, they'll all be up within just a few days of each other. Keep a close eye on your water levels - more light and more growth require more water. You should now have one seedling growing out of each dimple. If a few are empty that's okay.. you can drop in a couple of seeds into the empty hole and all will be well. As the seedlings grow and begin to get thick in the box you can start harvesting. Cut two or three of the leaves from the outside of each of the plants. They continue to grow from the inside of the plant replacing the ones that you've harvested. It takes a little practice but it won't be long before you get the hang of it and will know just how often you can harvest from your box. If it starts getting too thick you can remove every other plant if you need to, just cut off at the roots and eat the tops. At this stage you can add a liquid fertilizer like Miracle Gro (dilute it to about a quarter of the suggested strength and use it every time you fill your cups) or compost tea, . I had three boxes going at a time. One that I was harvesting from. One that was growing and getting ready for harvesting and one that was newly seeded. That way as a box became 'old' and the plants couldn't produce anymore I'd have another one ready to take it's place. I can't give you a time frame on this. There are many factors. The amount of available light, the temperature, availability of water. Skipping on the watering and allowing the cups to go dry can be devastating, sometimes the wicks will get over dry and won't draw again and you'll have lost the box. After the plants are spent. Dump out the box, clean it up and give it a quick dip in the same bleach solution you'd use to do any plant container to sterilize and you'll be all set to start another box. Use fresh dixie cups and fresh string. You can reuse the gravel after you bake it to sterilize and the soil you can use for transplanting mature plants, or better yet, toss it into your compost. I used this system when it was too cold outdoors to plant. With my set up it allowed me to have a fresh salad every day of the week, year 'round. If you have space and a taste for other things in the winter time and hate the high prices, or just prefer organic foods, other plants that I tried in these boxes include: Radishes, Globe Carrots, Spinach, a variety of kitchen herbs, and mint. I've also used the boxes to start plants for setting out in the garden. A great way to get good veggie starts with the least amount of work. The only rule of thumb as far as what plants you can grow is that they be shallow rooted and fast growing. As far as spacing. Pretty much just follow the recommendation on the package for the distance between the plants. The boxes also work really well for a light garden if you're already equipped with lighting for spring starts use the equipment during the winter to provide fresh greens. The boxes, when filled with bright green lettuce actually looked really pretty. You don't need to make yours as fancy, but it is nice to see a pretty that you can eat and saves you money too! You can mix similar lettuce varieties, too! Try alternating Black Seeded Simpson with a Red Leaf.... Don't forget you can modify this idea, if you choose. Use wider boards to give a deeper planting bed and try some plants that need the bit more depth. I could see this system working really well for this like bush beans and bush peas as well. Hmmmm, that's got me to thinking again, and for me, that's dangerous! hehehehehe
|
Remember, Topper's Place is moving, feel free to add the new link to your Favorites: www.toppers-place.comEmail:
Topper (Linda)
|